主题
生产部署
服务器软硬件要求
仅以部署单个服务/中间件评估,可根据实际情况调整配置和部署架构,如:开发或测试环境可一起部署到一台4核8G服务器上,生产环境也可增减配置。
FgxAdmin管理后台
操作系统:CentOS 8.3+ (或 Alibaba Cloud Linux 3+)
服务器:4核8G内存100G硬盘 - 1台 (集群部署需2台以上)
FgxGen代码生成器
操作系统:CentOS 8.3+ (或 Alibaba Cloud Linux 3+)
服务器:4核8G内存100G硬盘 - 1台
MySQL数据库:
操作系统:CentOS 8.3+ (或 Alibaba Cloud Linux 3+)
服务器:4核8G内存100G硬盘 - 1台 (单机)
Redis:
操作系统:CentOS 8.3+ (或 Alibaba Cloud Linux 3+)
服务器:2核4G内存40G硬盘 - 1台 (单机)
MinIO:
操作系统:CentOS 8.3+ (或 Alibaba Cloud Linux 3+)
服务器:2核4G内存100G硬盘 - 1台 (单机)
Nginx:
操作系统:CentOS 8.3+ (或 Alibaba Cloud Linux 3+)
服务器:4核8G内存100G硬盘 - 1台 (单机)
安装依赖中间件
可复用公司已有的中间件。建议使用独立的服务器安装对应的中间件服务。
依赖中间件列表:
- MySQL数据库v5.7+
- Redis v6.0+
- Nacos v2.x+
- Minio 最新版本
- Nginx 1.20.1+
安装MySQL
以单机安装为例
shell
wget https://downloads.mysql.com/archives/get/p/23/file/mysql-5.7.30-1.el6.x86_64.rpm-bundle.tar
tar -xvf mysql-5.7.30-1.el6.x86_64.rpm-bundle.tar
sudo yum install mysql-community-{server,client,common,libs}-*
sudo service mysqld start
shell
sudo grep 'temporary password' /var/log/mysqld.logshell
mysql -uroot -psql
ALTER USER 'root'@'localhost' IDENTIFIED BY 'YouNewPassword';
quit;
安装Redis
shell
yum install redis
安装完后修改配置文件:
vim /etc/redis.conf
1)开启远程访问
找到“bind 127.0.0.1 -::1” 改为bind * -:😗

找到“protected-mode yes”并改为“protected-mode no”

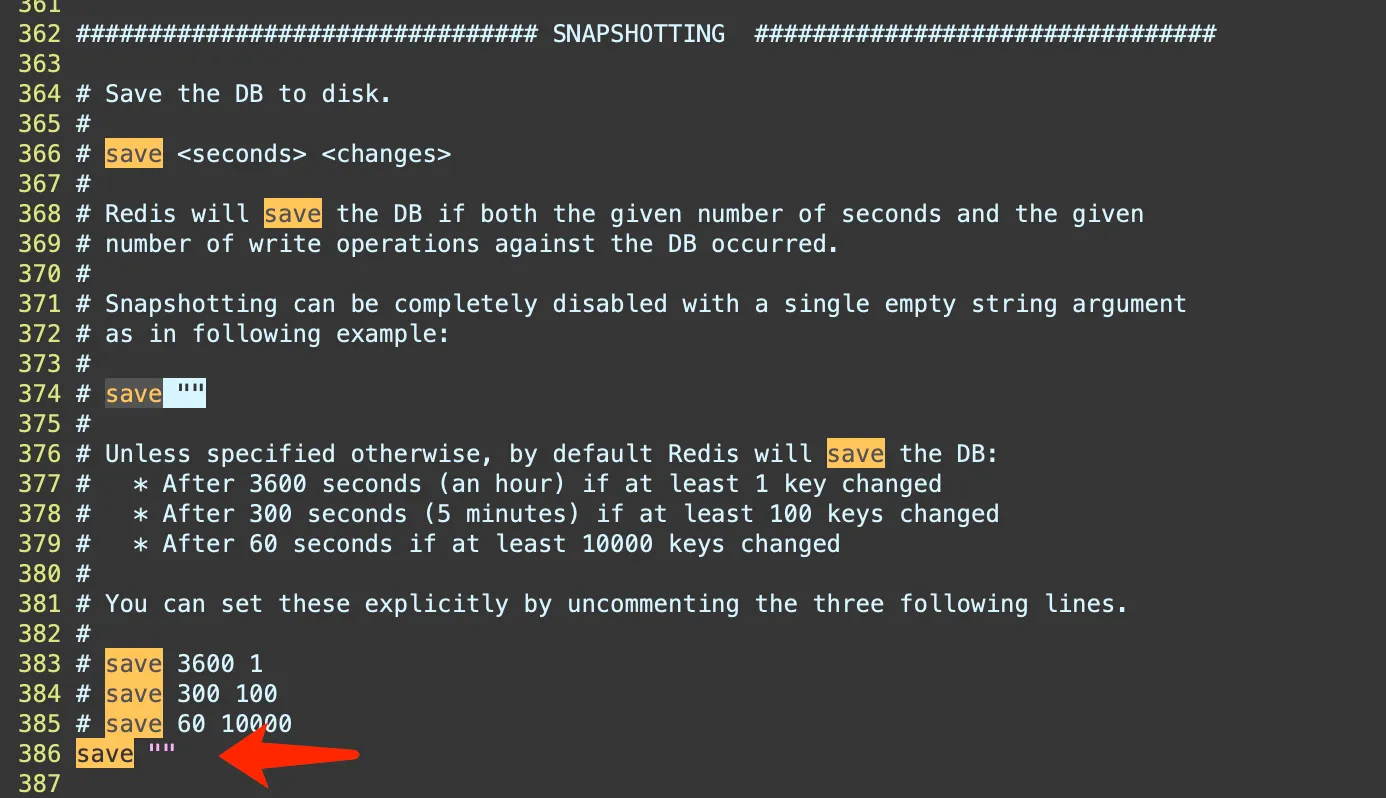
- 关闭RDB快照持久化
增加以下设置关闭RDB快照功能
save ""
- 开启AOF持久化
修改以下项
appendonly no 改为appendonly yes
appendfsync everysec 默认每秒持久化一次,保持不变也可根据需要修改


4)设置密码
找到"requirepass foobared"选项,去掉前面的#注释,设置密码,如:requirepass Asdf123!

shell
# 设置开机启动
systemctl enable redis

# 启动redis
systemctl start redis

# 停止redis
systemctl stop redis
安装Nacos
1、根据官方文档安装2.x版本,本文以v2.3.2为例
https://nacos.io/docs/latest/quickstart/quick-start/
2、修改配置文件conf/application.properties
properties
### 启用鉴权:
nacos.core.auth.system.type=nacos
nacos.core.auth.enabled=true

### 2.1.0 版本后 (推荐将配置项设置为Base64编码的字符串,且原始密钥长度不得低于32字符)
nacos.core.auth.plugin.nacos.token.secret.key=NTg2NmJmYTliZDkwYmU4NDkxNTgyODVjNmE3ZDgyZDEwYTIyOGYwMTM1MGRjMjQ0MzJhZGUyYTNmMGZlMTM1Ygo=

### 配置自定义身份识别的key(不可为空)和value(不可为空)
nacos.core.auth.server.identity.key=example
nacos.core.auth.server.identity.value=example
3、启动服务
properties
# 启动命令(standalone代表着单机模式运行,非集群模式):
sh startup.sh -m standalone

# 关闭命令
sh shutdown.sh
4、防火墙和安全组开放以下端口:8848、9848、9849
5、打开配置页面:http://ip:8848/nacos
默认账号密码:nacos/nacos (登录后可修改)
安装MinIO
1、创建minio文件存储目录及日志目录
shell
mkdir -p /opt/minio
mkdir -p /opt/minio/data
mkdir -p /opt/minio/logs
2、下载MinIO
shell
cd /opt/minio
wget https://dl.min.io/server/minio/release/linux-amd64/minio
chmod +x minio
3、新建启动脚本
shell
vi run.sh修改密码,然后复制以下内容到脚本里
shell
#!/bin/bash
export MINIO_ROOT_USER=admin
export MINIO_ROOT_PASSWORD=Asdf123!
# nohup启动服务 指定文件存放路径 /opt/minio/data 还有设置日志文件路径 /opt/minio/logs
nohup ./minio server --address :9000 --console-address :9001 /opt/minio/data > /opt/minio/logs/minio.log 2>&1 &
4、启动MinIO
shell
chmod u+x run.sh

# 启动minio服务
./run.sh

# 查看日志
tail -200f /opt/minio/logs/minio.log
5、访问MinIO管理后台
http://服务器IP:9001
在后台可创建Bucket和Access key/Secret Key
安装Nginx
shell
# 安装 Nginx:
sudo yum install nginx

# 启动 Nginx 服务:
sudo systemctl start nginx

# 设置 Nginx 开机自启动:
sudo systemctl enable nginx

# 验证 Nginx 是否正常运行:
sudo systemctl status nginx

# 重新加载 Nginx 配置:
#sudo systemctl reload nginx

# 停止 Nginx 服务:
#sudo systemctl stop nginx
修改Nginx配置文件:/etc/nginx/nginx.conf
nginx可通过server_name(域名)来区分不同应用,也可以通过不同端口来区分应该,本文以不同端口为例,参考配置如下,请自行修改fgx-admin-bootstrap-IP和generator-admin-api-IP。
shell
# For more information on configuration, see:
#   * Official English Documentation: http://nginx.org/en/docs/
#   * Official Russian Documentation: http://nginx.org/ru/docs/

user nginx;
worker_processes auto;
error_log /var/log/nginx/error.log;
pid /run/nginx.pid;

# Load dynamic modules. See /usr/share/doc/nginx/README.dynamic.
include /usr/share/nginx/modules/*.conf;

events {
    worker_connections 1024;
}

http {
    log_format  main  '$remote_addr - $remote_user [$time_local] "$request" '
                      '$status $body_bytes_sent "$http_referer" '
                      '"$http_user_agent" "$http_x_forwarded_for"';

    access_log  /var/log/nginx/access.log  main;

    sendfile            on;
    tcp_nopush          on;
    tcp_nodelay         on;
    keepalive_timeout   65;
    types_hash_max_size 4096;

    gzip on;
    gzip_comp_level 6;
    gzip_min_length 128;
    gzip_proxied any;
    gzip_vary on;
    gzip_types
    	application/atom+xml
    	application/javascript
    	application/json
    	application/ld+json
    	application/manifest+json
    	application/rss+xml
    	application/vnd.geo+json
    	application/vnd.ms-fontobject
    	application/x-font-ttf
    	application/x-web-app-manifest+json
    	application/xhtml+xml
    	application/xml
    	font/opentype
    	image/bmp
    	image/svg+xml
    	image/x-icon
    	text/cache-manifest
    	text/css
    	text/plain
    	text/vcard
    	text/vnd.rim.location.xloc
    	text/vtt
    	text/x-component
    	text/x-cross-domain-policy;


    include             /etc/nginx/mime.types;
    default_type        application/octet-stream;

    # Load modular configuration files from the /etc/nginx/conf.d directory.
    # See http://nginx.org/en/docs/ngx_core_module.html#include
    # for more information.
    include /etc/nginx/conf.d/*.conf;

    server {
        listen       80;
        listen       [::]:80;
        server_name  localhost;
        #root         /usr/share/nginx/html;
        root         /opt/fgx-admin-ui;

        # Load configuration files for the default server block.
        include /etc/nginx/default.d/*.conf;

        error_page 404 /404.html;
            location = /40x.html {
        }

        error_page 500 502 503 504 /50x.html;
            location = /50x.html {
        }

        location ^~ /api/
        {
            proxy_pass http://fgx-admin-bootstrap-IP:8080/;
            proxy_set_header Host $http_host;
            proxy_set_header X-Real-IP $remote_addr;
            proxy_set_header X-Forwarded-For $proxy_add_x_forwarded_for;
            proxy_set_header X-Forwarded-Proto $scheme;
            proxy_http_version 1.1;
        }
    }

    server {
        listen       90;
        listen       [::]:90;
        server_name  localhost;
        #root         /usr/share/nginx/html;
        root         /opt/fgx-generator-ui;

        # Load configuration files for the default server block.
        include /etc/nginx/default.d/*.conf;

        error_page 404 /404.html;
            location = /40x.html {
        }

        error_page 500 502 503 504 /50x.html;
            location = /50x.html {
        }

        location ^~ /api/
        {
            proxy_pass http://generator-admin-api-IP:8090/;
            proxy_set_header Host $http_host;
            proxy_set_header X-Real-IP $remote_addr;
            proxy_set_header X-Forwarded-For $proxy_add_x_forwarded_for;
            proxy_set_header X-Forwarded-Proto $scheme;
            proxy_http_version 1.1;
        }
    }
}
shell
systemctl reload nginx传统虚拟机部署
FgxAdmin
前端fgx-admin-ui
1、构建前端项目fgx-admin-ui,在项目根目录执行以下命令:
shell
npm run build:prod2、把dist下的所有文件拷贝到nginx服务器的/opt/fgx-admin-ui目录下
后端fgx-admin-bootstrap
- 在mysql数据库中执行初始化SQL脚本,版本号自动修改
shell
fgx-admin-java/fgx-admin-bootstrap/fgx-admin-bootstrap-init-v1.0.0.sql- 修改配置文件和启动脚本,如生产部署修改application-prod.yml和boot-prod.sh
application-prod.yml:
修改数据库、Redis、Email服务器、OSS(如:MinIO)的等配置信息。
boot-prod.sh:
修改nacos服务器配置信息,并把配置文件放到nacos配置中心来维护,以方便动态修改。
登录nacos管理后台创建配置文件, dataId格式为:
应用名-activeProfile.yml
应用名-log4j2-activeProfile.xml
如:fgx-admin-bootstrap-prod.yml 和fgx-admin-bootstrap-log4j2-prod.xml
- maven构建项目
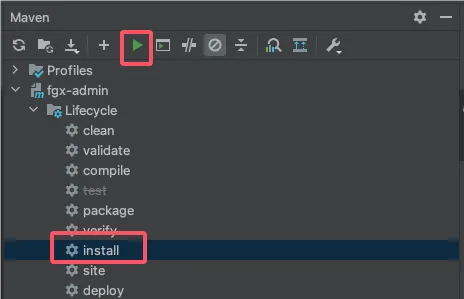
默认使用外置配置文件模式,打包时会把配置文件拷贝到config目录下,config目录下的配置文件优先级高于jar包内的配置文件,方便在不重新构建的情况下动态修改配置。
- 把fgx-admin-bootstrap/target/fgx-admin-bootstrap.tar拷贝到应用服务器上,如/data/apps/fgx-admin-bootstrap目录下
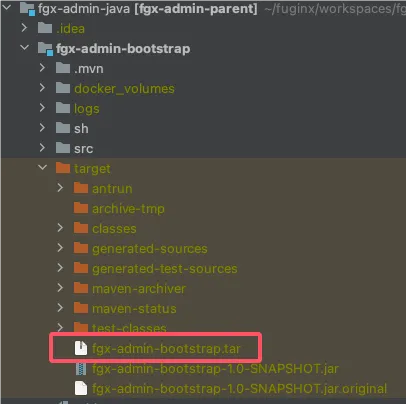
解压tar包并启动服务
shell
cd /data/apps/fgx-admin-bootstrap

# 解压
tar -xvf fgx-admin-bootstrap.tar

# 加执行权限
chmod 755 ./boot-prod.sh

# 启动服务
./boot-prod.sh start
常用命令:
shell
# 启动服务
./boot-prod.sh start

# 停止服务
./boot-prod.sh stop

# 重启服务
./boot-prod.sh restart

# 查看状态
./boot-prod.sh status
访问
浏览器打开http://nginx服务器IP/
在多租户模式下,系统内置两个账号:
1、超级管理员:admin/Asdf123!
2、企业用户账号:user1/Asdf123!
在单租户模式下,系统内置账号:
系统管理员:admin/Asdf123!
FgxGen代码生成器
前端generator-admin-ui
1、构建前端项目generator-admin-ui,在项目根目录执行以下命令:
shell
npm run build:prod2、把dist下的所有文件拷贝到nginx服务器的/opt/generator-admin-ui目录下
后端generator-admin-api
- 在mysql数据库中执行初始化SQL脚本,版本号自动修改
shell
generator-admin-api/generator-admin-api-init-v1.0.0.sql- 修改配置文件和启动脚本,如生产部署修改application-prod.yml和boot-prod.sh
application-prod.yml:
修改数据库、Redis、Email服务器、OSS(如:MinIO)等配置信息。
boot-prod.sh:
修改nacos服务器配置信息,并把配置文件放到nacos配置中心来维护,以方便动态修改。
登录nacos管理后台创建配置文件, dataId格式为:
应用名-activeProfile.yml
应用名-log4j2-activeProfile.xml
如:generator-admin-api-prod.yml 和generator-admin-api-log4j2-prod.xml
- maven构建项目
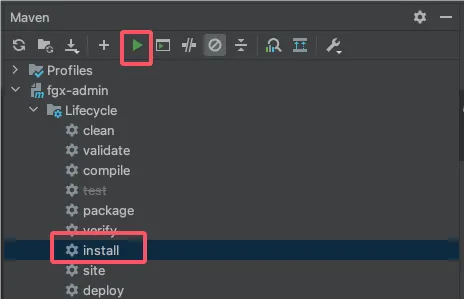
默认使用外置配置文件模式,打包时会把配置文件拷贝到config目录下,config目录下的配置文件优先级高于jar包内的配置文件,方便在不重新构建的情况下动态修改配置。
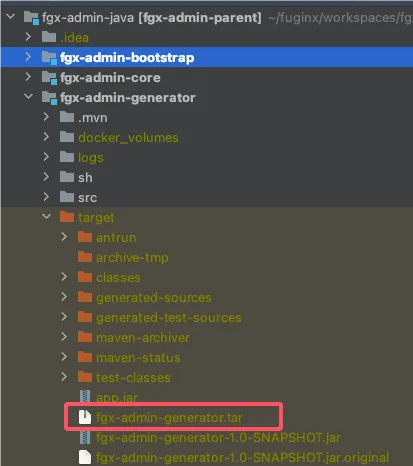
- 把generator-admin-api/target/generator-admin-api.tar拷贝到应用服务器上,如/data/apps/generator-admin-api目录下
解压tar包并启动服务
shell
cd /data/apps/generator-admin-api

# 解压
tar -xvf generator-admin-api.tar

# 加执行权限
chmod 755 ./boot-prod.sh

# 启动服务
./boot-prod.sh start
常用命令:
shell
# 启动服务
./boot-prod.sh start

# 停止服务
./boot-prod.sh stop

# 重启服务
./boot-prod.sh restart

# 查看状态
./boot-prod.sh status
访问
代码生成器默认以单租户模式运行,系统内置账号:
系统管理员:admin/Asdf123!
Docker容器部署
如果要把FgxAdmin和FgxGen同时安装到同一台宿主服务器,请自行修改映射端口。
FgxAdmin
前端fgx-admin-ui
1、构建前端项目fgx-admin-ui,在项目根目录执行以下命令:
shell
npm run build:prod2、构建docker镜像
镜像使用nginx:1.26.1构建,默认配置文件nginx.conf在项目根目录下,已开启gzip压缩,已配置后端接口反射代理,可根据需要修改。
shell
server {
      listen       80;
      listen       [::]:80;
      server_name  localhost;
      #root         /usr/share/nginx/html;
      root         /opt/fgx-admin-ui;

      # Load configuration files for the default server block.
      include /etc/nginx/default.d/*.conf;

      error_page 404 /404.html;
          location = /40x.html {
      }

      error_page 500 502 503 504 /50x.html;
          location = /50x.html {
      }

      location ^~ /api/
      {
          proxy_pass http://fgx-admin-bootstrap:8080/;
      }
  }
默认部署目录:/opt/fgx-admin-ui
配置文件目录:/etc/nginx/nginx.conf
在项目根目录执行以下命令,镜像名称和版本号根据实际情况修改:
shell
docker build --platform linux/amd64 -t fgx-admin-ui:1.0.0 .将镜像推送到中央仓库(或公司私有仓库):
shell
docker login -u your_username -p your_password
docker push fgx-admin-ui:1.0.0
运行镜像
shell
docker run --rm -d -p 80:80 --privileged \
-v "./docker_volumes/nginx/logs:/var/log/nginx" fgx-admin-ui:1.0.0
nginx的日志映射到宿主机的./docker_volumes/nginx/logs目录下
后端fgx-admin-bootstrap
- 在mysql数据库中执行初始化SQL脚本,版本号自动修改
shell
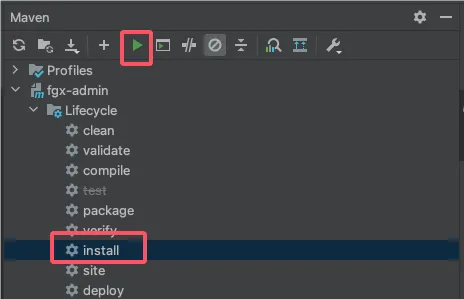
fgx-admin-bootstrap-init-v1.0.0.sql- maven构建项目
- 构建docker镜像
在项目根目录执行以下命令,镜像名称和版本号根据实际情况修改:
shell
docker build --platform linux/amd64 -t fgx-admin-bootstrap:1.0.0 .默认部署目录:/opt/fgx-admin-bootstrap
- 将镜像推送到中央仓库(或公司私有仓库):
shell
docker push fgx-admin-bootstrap:1.0.0- 运行镜像
运行前需根据实际情况修改nacos、mysql、redis和oss(以minio为例)的参数
shell
docker run --rm -d -p 8080:8080 --privileged \
-v "./docker_volumes/fgx-admin-bootstrap/config:/opt/fgx-admin-bootstrap/config" \
-v "./docker_volumes/fgx-admin-bootstrap/logs:/opt/fgx-admin-bootstrap/logs" \
-e "spring.profiles.active=prod" \
-e "spring.cloud.nacos.server-addr={your nacos host ip}:8848" \
-e "spring.cloud.nacos.username=nacos" \
-e "spring.cloud.nacos.password=nacos" \
-e "spring.cloud.nacos.config.namespace=public" \
-e "spring.cloud.nacos.discovery.namespace=public" \
-e "spring.cloud.nacos.config.enabled=true" \
-e "spring.cloud.nacos.discovery.enabled=true" \
-e "mybatis-flex.datasource.default.url=jdbc:p6spy:mysql://{your mysql host ip}:3306/fgxadmin?rewriteBatchedStatements=true&autoReconnect=true&useUnicode=true&characterEncoding=UTF-8&useSSL=false&serverTimezone=Asia/Shanghai&allowPublicKeyRetrieval=true" \
-e "mybatis-flex.datasource.default.username={your mysql username}" \
-e "mybatis-flex.datasource.default.password={your mysql password}" \
-e "spring.data.redis.host={your redis host ip}" \
-e "spring.data.redis.password={your redis password}" \
-e "setting.oss.minio.accessKey=" \
-e "setting.oss.minio.secretKey=" \
-e "setting.oss.minio.endpoint=http://{your minio host ip}:9000" \
-e "setting.oss.minio.bucketName=fgx-admin" \
fgx-admin-bootstrap:1.0.0
服务配置文件映射到宿主机的./docker_volumes/fgx-admin-bootstrap/config目录下,如果不使用nacos配置中心时,可把自定义的配置文件(application-prod.yml和log4j2-prod.xml)放在该目录下。
日志文件映射到宿主机的./docker_volumes/fgx-admin-bootstrap/logs目录下
访问
以上步骤完成后,在浏览器打开:http://宿主机IP/
在多租户模式下,系统内置两个账号:
1、超级管理员:admin/Asdf123!
2、企业用户账号:user1/Asdf123!
在单租户模式下,系统内置账号:
系统管理员:admin/Asdf123!
FgxGen代码生成器
前端generator-admin-ui
1、构建前端项目generator-admin-ui,在项目根目录执行以下命令:
shell
npm run build:prod2、构建docker镜像
镜像使用nginx:1.26.1构建,默认配置文件nginx.conf在项目根目录下,已开启gzip压缩,已配置后端接口反射代理,可根据需要修改。
shell
server {
      listen       80;
      listen       [::]:80;
      server_name  localhost;
      #root         /usr/share/nginx/html;
      root         /opt/generator-admin-ui;

      # Load configuration files for the default server block.
      include /etc/nginx/default.d/*.conf;

      error_page 404 /404.html;
          location = /40x.html {
      }

      error_page 500 502 503 504 /50x.html;
          location = /50x.html {
      }

      location ^~ /api/
      {
          proxy_pass http://generator-admin-api:8090/;
      }
  }
默认部署目录:/opt/generator-admin-ui
配置文件目录:/etc/nginx/nginx.conf
在项目根目录执行以下命令,镜像名称和版本号根据实际情况修改:
shell
docker build --platform linux/amd64 -t generator-admin-ui:1.0.0 .将镜像推送到中央仓库(或公司私有仓库):
shell
docker login -u your_username -p your_password
docker push generator-admin-ui:1.0.0
运行镜像
shell
docker run --rm -d -p 80:80 --privileged \
-v "./docker_volumes/nginx/logs:/var/log/nginx" generator-admin-ui:1.0.0
nginx的日志映射到宿主机的./docker_volumes/nginx/logs目录下
后端generator-admin-api
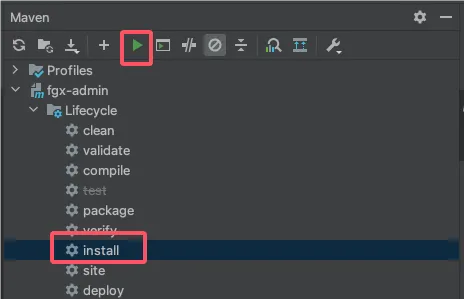
1、maven构建项目
2、构建docker镜像
在项目根目录执行以下命令,镜像名称和版本号根据实际情况修改:
shell
docker build --platform linux/amd64 -t generator-admin-api:1.0.0 .默认部署目录:/opt/generator-admin-api
3、将镜像推送到中央仓库(或公司私有仓库):
shell
docker push generator-admin-api:1.0.04、运行镜像
运行前需根据实际情况修改nacos、mysql、redis和oss(以minio为例)的参数
shell
docker run --rm -d -p 8080:8080 --privileged \
-v "./docker_volumes/generator-admin-api/config:/opt/generator-admin-api/config" \
-v "./docker_volumes/generator-admin-api/logs:/opt/generator-admin-api/logs" \
-e "spring.profiles.active=prod" \
-e "spring.cloud.nacos.server-addr={your nacos host ip}:8848" \
-e "spring.cloud.nacos.username=nacos" \
-e "spring.cloud.nacos.password=nacos" \
-e "spring.cloud.nacos.config.namespace=public" \
-e "spring.cloud.nacos.discovery.namespace=public" \
-e "spring.cloud.nacos.config.enabled=true" \
-e "spring.cloud.nacos.discovery.enabled=true" \
-e "mybatis-flex.datasource.default.url=jdbc:p6spy:mysql://{your mysql host ip}:3306/fgxgenerator?rewriteBatchedStatements=true&autoReconnect=true&useUnicode=true&characterEncoding=UTF-8&useSSL=false&serverTimezone=Asia/Shanghai&allowPublicKeyRetrieval=true" \
-e "mybatis-flex.datasource.default.username={your mysql username}" \
-e "mybatis-flex.datasource.default.password={your mysql password}" \
-e "spring.data.redis.host={your redis host ip}" \
-e "spring.data.redis.password={your redis password}" \
-e "setting.oss.minio.accessKey=" \
-e "setting.oss.minio.secretKey=" \
-e "setting.oss.minio.endpoint=http://{your minio host ip}:9000" \
-e "setting.oss.minio.bucketName=fgx-gen" \
generator-admin-api:1.0.0
服务配置文件映射到宿主机的./docker_volumes/generator-admin-api/config目录下,如果不使用nacos配置中心时,可把自定义的配置文件(application-prod.yml和log4j2-prod.xml)放在该目录下。
日志文件映射到宿主机的./docker_volumes/generator-admin-api/logs目录下
访问
以上步骤完成后,在浏览器打开:http://宿主机IP/
代码生成器默认以单租户模式运行,系统内置账号:
系统管理员:admin/Asdf123!
一键部署功能
FgxAdmin依赖的中间件较多,手动部署步骤繁复,且易于出错。一键部署功能是基于docker-compose实现,依赖的中间件和主服务都以镜像的方式提供,方便快捷而且部署简单。
FgxAdmin
构建服务镜像
根据上一章节(Docker容器部署)构建fgx-admin-ui和fgx-admin-bootstrap的镜像并推送到docker中央仓库(或公司私有仓库)
修改docker-compose.yml文件
根据实际情况修改MySQL/Redis/MinIO/Nacos的账号密码等信息。也可使用默认配置。
修改install.sh
修改以下两个链接为实际的链接,
shell
https://domain:port/path/to/install.sh
https://domain/path/to/docker-compose.yml
https://domain/path/to/fgx-admin-bootstrap-init-v1.0.0.sql
一键部署
在Linux服务器上执行以下命令:
shell
wget https://domain:port/path/to/install.sh && bash install.sh执行上面命令会自动下载install.sh、docker-compose.yml和fgx-admin-bootstrap-init-v1.0.0.sql文件,安装docker和docker-compose, 最后启动镜像服务。
注意:如果install.sh、docker-compose.yml和fgx-admin-bootstrap-init-v1.0.0.sql没法通过网络的方式获取,可手动把这三个文件手动上传到服务器上(如:/data 目录),然后执行部署命令:
shell
bash install.sh访问
以上步骤完成后,在浏览器打开:http://宿主机IP/
在多租户模式下,系统内置两个账号:
1、超级管理员:admin/Asdf123!
2、企业用户账号:user1/Asdf123!
在单租户模式下,系统内置账号:
系统管理员:admin/Asdf123!
停止服务
在docker-compose.yml所在目录下执行命令:
shell
docker-compose downFgxGen代码生成器
构建服务镜像
根据上一章节(Docker容器部署)构建generator-admin-ui和generator-admin-api的镜像并推送到docker中央仓库(或公司私有仓库)
修改docker-compose.yml文件
根据实际情况修改MySQL/Redis/MinIO/Nacos的账号密码等信息。也可使用默认配置。
修改install.sh
修改以下两个链接为实际的链接,
shell
https://domain:port/path/to/install.sh
https://domain/path/to/docker-compose.yml
https://domain/path/to/generator-admin-api-init-v1.0.0.sql
一键部署
在Linux服务器上执行以下命令:
shell
wget https://domain:port/path/to/install.sh && bash install.sh执行上面命令会自动下载install.sh、docker-compose.yml和generator-admin-api-init-v1.0.0.sql文件,安装docker和docker-compose, 最后启动镜像服务。
注意:如果install.sh、docker-compose.yml和generator-admin-api-init-v1.0.0.sql没法通过网络的方式获取,可手动把这三个文件手动上传到服务器上(如:/data 目录),然后执行部署命令:
shell
bash install.sh访问
以上步骤完成后,在浏览器打开:http://宿主机IP/
代码生成器默认以单租户模式运行,系统内置账号:
系统管理员:admin/Asdf123!
停止服务
在docker-compose.yml所在目录下执行命令:
shell
docker-compose down